Aorus B450 Pro WiFi Manual: Comprehensive Guide (Updated 02/10/2026)
This manual provides detailed instructions for the GIGABYTE B450 AORUS PRO WIFI motherboard‚ a high-end board offering robust features and reliable performance for Ryzen processors.
The Aorus B450 Pro WiFi is a feature-rich motherboard designed for AMD Ryzen processors‚ offering a compelling blend of performance‚ reliability‚ and connectivity. This guide serves as a comprehensive resource for users‚ from first-time builders to experienced enthusiasts‚ seeking to maximize their system’s potential. Built around the AMD B450 chipset‚ this motherboard supports a wide range of Ryzen CPUs‚ providing a solid foundation for gaming‚ content creation‚ and everyday computing tasks.
Key strengths of the Aorus B450 Pro WiFi include its robust power delivery system‚ ensuring stable operation even under heavy loads‚ and its integrated WiFi module‚ offering convenient wireless connectivity. The board also boasts multiple USB ports‚ fast storage options like NVMe SSD support‚ and high-quality audio components. This manual will walk you through every aspect of the motherboard‚ from unboxing and installation to BIOS configuration and troubleshooting‚ empowering you to build and optimize your dream PC.
Key Features and Specifications
The Aorus B450 Pro WiFi boasts a robust feature set‚ starting with support for AMD Ryzen 1st‚ 2nd‚ and 3rd Generation processors (check CPU compatibility list). It features four DDR4 DIMM slots‚ supporting up to 64GB of RAM and speeds up to 3200MHz with overclocking (XMP profile activation recommended). Storage options include 4 x SATA 6Gb/s connectors and a single Ultra Fast M.2 slot supporting NVMe PCIe Gen3 x4 SSDs for blazing-fast speeds.
Connectivity is comprehensive‚ with 8 x USB ports (including USB 3.1 Gen2)‚ integrated Intel Gigabit LAN‚ and dual-band 802.11ac Wireless LAN with Bluetooth 4.2. The Realtek ALC887 audio codec delivers high-definition sound. Expansion slots include 1 x PCI-E 3.0 x16 and 1 x PCI-E 2.0 x16 (running at x4 mode). Power delivery is handled by a 6+2 phase digital VRM design‚ ensuring stability. Form factor is ATX.
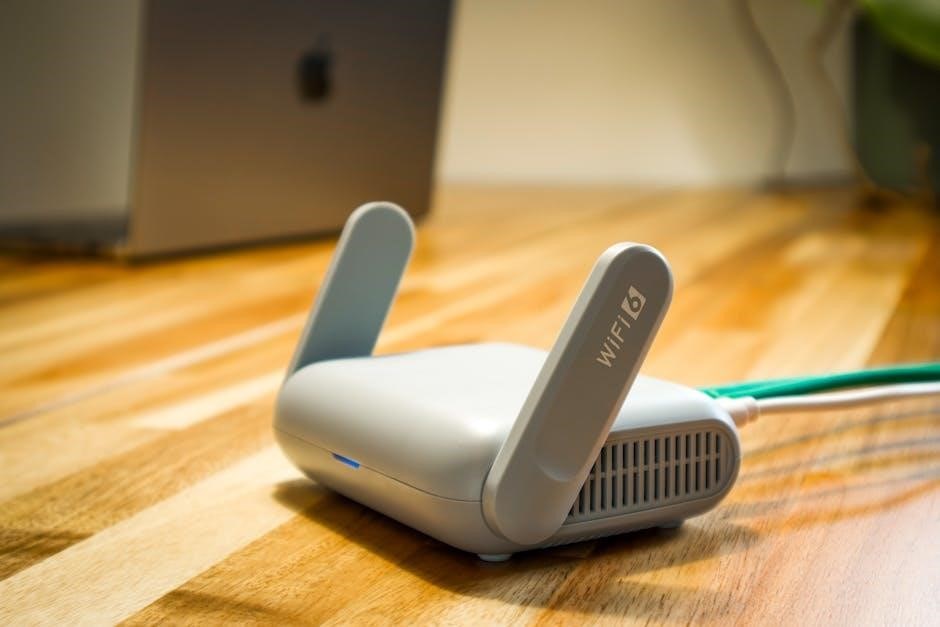
Unboxing and Component Overview
Upon opening the box‚ you’ll find the Aorus B450 Pro WiFi motherboard carefully packaged to prevent damage during shipping. Included accessories typically comprise the I/O shield‚ SATA cables (usually two or three)‚ the WiFi antenna‚ a user manual‚ and potentially some Aorus-branded cable ties. Inspect the motherboard visually for any signs of physical damage before proceeding.
The motherboard itself showcases a predominantly black PCB with silver accents‚ embodying the Aorus aesthetic. Key components are readily identifiable: the AMD AM4 CPU socket‚ DDR4 DIMM slots‚ PCIe expansion slots‚ M.2 slot (often covered by a heatsink)‚ SATA ports‚ and the rear panel I/O cluster. Note the location of front panel connectors and USB headers for later installation. Familiarize yourself with these components before installation to streamline the build process.
Motherboard Layout and Connectors
The Aorus B450 Pro WiFi boasts a well-organized layout designed for efficient component installation and cable management. The AM4 CPU socket is centrally located‚ surrounded by DIMM slots for RAM. PCIe slots‚ crucial for graphics cards and expansion cards‚ are positioned to accommodate various configurations. An M.2 slot‚ supporting high-speed NVMe SSDs‚ is conveniently placed for optimal cooling.
Numerous connectors populate the board‚ including SATA ports for traditional storage‚ USB headers for front panel connectivity‚ and fan headers for cooling solutions. The rear I/O panel offers a comprehensive array of ports‚ while front panel connectors require careful attention during assembly. Understanding the placement and function of each connector is vital for a successful build and optimal system performance.
Front Panel Connectors Explained
Connecting the front panel connectors accurately is crucial for system functionality. These small pins control essential features like power‚ reset‚ and HDD activity LEDs; The Aorus B450 Pro WiFi’s manual provides a detailed diagram illustrating the correct pin assignments. Misalignment can prevent the system from powering on or cause incorrect LED behavior.
Typically‚ these connectors include Power SW (Power Switch)‚ Reset SW (Reset Switch)‚ Power LED‚ HDD LED‚ and front panel USB connectors. Pay close attention to the polarity of the LEDs – incorrect orientation will result in them not illuminating. Referencing the motherboard manual during this step is highly recommended to avoid potential issues and ensure a smooth building experience.

Rear Panel I/O Ports – Detailed Description

The rear panel I/O cluster of the Aorus B450 Pro WiFi offers a comprehensive selection of ports for connecting peripherals and external devices. This includes several USB ports – USB 3.1 Gen2‚ USB 3.1 Gen1‚ and USB 2.0 – providing varying data transfer speeds. A PS/2 port remains available for legacy keyboard and mouse compatibility.
For visual output‚ the board features HDMI and DisplayPort connectors‚ supporting high-resolution displays. An integrated Realtek Gigabit Ethernet port ensures a stable network connection‚ while the built-in WiFi module provides wireless connectivity. Audio jacks accommodate multi-channel sound systems‚ and an optical S/PDIF output delivers digital audio. Understanding each port’s function is vital for optimal system setup and performance.
Internal Connectors: SATA‚ USB‚ and Fan Headers
Inside the Aorus B450 Pro WiFi‚ a variety of internal connectors facilitate expansion and customization. Multiple SATA 6Gb/s ports support connecting storage devices like hard drives and SSDs‚ enabling high-speed data access. Several USB 3.1 Gen1 and USB 2.0 headers allow for adding front panel USB ports or expanding connectivity via expansion cards.
For cooling solutions‚ the motherboard provides numerous fan headers‚ including dedicated headers for CPU fans‚ case fans‚ and even liquid cooling pumps. These headers often support PWM control‚ allowing for precise fan speed adjustments. Proper utilization of these connectors ensures optimal system cooling and stability. Careful planning of component placement and cable management is recommended for a clean build.
BIOS Setup and Navigation
Accessing the BIOS on the Aorus B450 Pro WiFi is typically done by pressing the ‘Delete’ key during the boot process. The UEFI BIOS interface offers a user-friendly graphical environment for configuring system settings. Navigation is primarily achieved using the keyboard – arrow keys for movement‚ ‘Enter’ to select‚ and ‘Esc’ to go back.
Key sections within the BIOS include the ‘M.I.T.’ (Motherboard Intelligent Tweaker) for overclocking and performance tuning‚ ‘Settings’ for configuring boot order and system features‚ and ‘Hardware Monitor’ for monitoring temperatures and voltages. Understanding these sections is crucial for optimizing system performance and stability. Saving changes before exiting is essential to apply the new configurations.
BIOS Update Procedures and Risks
Updating the BIOS on your Aorus B450 Pro WiFi is crucial for compatibility with newer CPUs and improved system stability. GIGABYTE provides several methods‚ including Q-Flash Plus – allowing updates without a CPU‚ RAM‚ or GPU installed – and updates through the BIOS itself. Download the latest BIOS file from the official GIGABYTE website.
However‚ BIOS updates carry inherent risks. A power interruption during the process can brick the motherboard‚ rendering it unusable. Ensure a stable power supply during the update. Incorrect BIOS versions can also cause instability or prevent the system from booting. Always carefully read and follow the instructions provided by GIGABYTE to minimize these risks. Back up your current BIOS if possible before proceeding.
Overclocking Basics with Aorus B450 Pro WiFi
The Aorus B450 Pro WiFi offers robust overclocking capabilities for Ryzen processors. Begin by entering the BIOS and navigating to the overclocking section‚ typically labeled “M.I.T.” or similar. Adjust the CPU multiplier incrementally‚ monitoring temperatures closely using software like HWMonitor. Increase the CPU core voltage cautiously; excessive voltage can damage the processor.

Memory overclocking is also possible by adjusting the DRAM frequency and timings. Utilize XMP profiles for pre-configured settings‚ or manually tweak timings for optimal performance. Always prioritize stability; thoroughly test your overclock with stress-testing tools like Prime95 or AIDA64. Proper cooling – a high-quality CPU cooler – is essential for successful overclocking.

XMP Profile Activation for RAM
Activating the XMP (Extreme Memory Profile) in your Aorus B450 Pro WiFi BIOS is the simplest way to achieve optimal RAM performance. Upon booting‚ enter the BIOS setup by pressing the designated key (usually Delete). Navigate to the “M.I.T.” section‚ then locate the XMP setting. Select “Profile 1” or the appropriate profile corresponding to your RAM’s specifications.

XMP profiles contain pre-configured timings‚ voltages‚ and frequencies set by the RAM manufacturer. Enabling XMP ensures your RAM operates at its advertised speed. Save the changes and exit the BIOS; the system will reboot. Verify the RAM speed within your operating system using tools like CPU-Z. If instability occurs‚ slightly increase the DRAM voltage within the BIOS.
Driver Installation and Software Suite
Proper driver installation is crucial for maximizing the Aorus B450 Pro WiFi’s functionality. Begin by installing the chipset drivers from the support disc or the GIGABYTE website‚ ensuring compatibility with your operating system. Next‚ install the audio‚ LAN‚ and USB drivers in that order. The Aorus Gaming Platform software suite offers advanced control over system settings‚ including RGB lighting‚ fan curves‚ and system monitoring.
Download the latest versions of all drivers and software from GIGABYTE’s official support page for the B450 AORUS PRO WIFI. Regularly updating drivers ensures optimal performance and stability. The software suite provides a user-friendly interface for customizing your system and monitoring its health.
Aorus Gaming Platform – Features and Usage
The Aorus Gaming Platform is a comprehensive software suite designed to enhance your gaming experience and system control. Key features include RGB Fusion 2.0 for customizable lighting effects across compatible components‚ Smart Fan 5 for precise fan speed control based on temperature sensors‚ and System Information Viewer for real-time monitoring of CPU temperature‚ voltage‚ and clock speeds.
Usage is straightforward: launch the application and navigate through the intuitive interface. Customize RGB lighting profiles‚ create fan curves for optimal cooling‚ and monitor system performance. The platform also offers features like EasyTune for basic overclocking adjustments and Network Monitoring for tracking bandwidth usage. Regularly check for updates to ensure you have the latest features and improvements.
Realtek Audio Driver Configuration
The Aorus B450 Pro WiFi utilizes a Realtek ALC887 audio codec‚ delivering high-definition audio capabilities. After installing the drivers from the support disc or the GIGABYTE website‚ open the Realtek Audio Console to configure your sound settings. Here‚ you can select your audio device‚ adjust speaker configuration (stereo‚ 4.1‚ 5.1‚ etc.)‚ and enable enhancements like Bass Boost and Virtual Surround.
Further customization options include microphone settings‚ noise suppression‚ and karaoke mode. Explore the advanced settings for equalizer adjustments and specific audio profiles tailored to gaming‚ music‚ or movies. Ensure the correct input and output devices are selected for optimal audio performance. Regularly updating the Realtek audio drivers is recommended for bug fixes and improved compatibility.
Intel LAN Driver Setup
The Aorus B450 Pro WiFi features an Intel Gigabit LAN controller‚ providing a stable and fast wired network connection. Upon installing the drivers – available on the support disc or GIGABYTE’s website – access the Intel Network Connections software. This utility allows you to monitor network status‚ configure connection settings‚ and troubleshoot potential issues.
Within the software‚ you can adjust settings like connection speed and duplex mode‚ though typically leaving these on auto-negotiation is optimal. Explore advanced options for VLAN tagging and other network configurations if required. Regularly updating the Intel LAN drivers ensures compatibility with the latest network protocols and resolves potential performance bottlenecks. Verify proper cable connection and network hardware functionality for optimal results.
Troubleshooting Common Issues
Encountering problems with your Aorus B450 Pro WiFi? This section addresses frequent issues. A “No POST” symptom often indicates a problem with the CPU‚ RAM‚ or GPU; reseat these components and check connections. USB port malfunctions can usually be resolved by reinstalling the chipset drivers or testing different USB ports. WiFi connectivity problems may stem from outdated drivers‚ incorrect password entry‚ or router incompatibility.
Ensure your WiFi adapter is enabled in the BIOS and that the antenna is securely connected. If issues persist‚ try resetting the network adapter or updating your router’s firmware. Always consult the GIGABYTE support website for the latest troubleshooting guides and BIOS updates‚ as these can resolve many common problems. A systematic approach is key to efficient diagnosis.
No POST Symptoms and Solutions
A “No POST” (Power On Self Test) situation means your system isn’t initiating the boot process. First‚ verify all power connections to the motherboard and PSU. Reseat the CPU‚ ensuring proper cooler installation‚ and check RAM modules – try booting with only one RAM stick installed in the recommended slot. Inspect the GPU‚ confirming it’s firmly seated in the PCIe slot.
Disconnect all non-essential peripherals (USB devices‚ extra drives) to rule out conflicts. Clear the CMOS by using the CLR_CMOS jumper on the motherboard. If the problem persists‚ a faulty component (PSU‚ CPU‚ motherboard) may be the cause. Consult the motherboard manual for beep codes‚ which can provide clues about the specific issue. Seek professional help if you’re uncomfortable performing these steps.
USB Port Problems and Fixes
Experiencing issues with USB ports? Begin by ensuring the USB devices are functioning correctly on another system. Check for bent pins inside the USB ports on the motherboard – use a flashlight for inspection. In BIOS‚ verify that USB controllers are enabled; sometimes‚ they are disabled by default. Update the motherboard chipset drivers‚ as outdated drivers can cause USB malfunctions.
Try different USB ports‚ as some may share bandwidth. If specific ports aren’t working‚ there might be a hardware issue. Power cycle the system completely (unplug the power cord). Consider a USB device conflict; disconnect unnecessary USB devices. If problems persist‚ reinstall the operating system‚ ensuring the latest USB drivers are installed during setup. Contact support if hardware failure is suspected.
WiFi Connectivity Issues – Diagnosis and Resolution
Troubleshooting WiFi? First‚ confirm your wireless network is functioning correctly with other devices. Ensure the WiFi antenna is securely connected to the Aorus B450 Pro WiFi motherboard. Verify the WiFi adapter is enabled in the BIOS settings. Update the WiFi driver to the latest version available from the GIGABYTE support website.
Check for interference from other wireless devices or physical obstructions. Reset the network adapter in Device Manager. If issues persist‚ try resetting the WiFi module through the BIOS or using the provided utility. Ensure your router’s firmware is up-to-date. Consider a clean reinstall of the WiFi driver. If problems continue‚ contact GIGABYTE support for further assistance.

Memory Compatibility and Support
The Aorus B450 Pro WiFi supports DDR4 memory‚ maximizing system performance. Consult the GIGABYTE website for a comprehensive Qualified Vendor List (QVL) detailing tested and compatible memory modules. This list ensures optimal stability and performance. Officially‚ the motherboard supports up to 64GB of RAM across four DIMM slots.
Memory speed is crucial; the B450 chipset supports speeds up to 3200MHz with overclocking. Ensure your RAM modules are installed in the correct DIMM slots for dual-channel operation (refer to the motherboard manual). XMP profiles allow for easy overclocking to supported speeds. Incompatible RAM can cause system instability or failure to boot. Always prioritize QVL-listed modules for guaranteed compatibility and performance.
CPU Compatibility List (Ryzen Processors)
The Aorus B450 Pro WiFi motherboard is designed for AMD Ryzen processors‚ specifically those utilizing the AM4 socket. It supports a wide range of Ryzen CPUs‚ from the first to the third generation‚ though BIOS updates may be required for newer processors. Always check the GIGABYTE website for the latest CPU compatibility list before installing a processor.
Ryzen 3000 series processors generally require a BIOS update to function correctly on the B450 chipset. Ensure you have the latest BIOS version installed before attempting to use these CPUs. Compatibility extends to Ryzen 5‚ Ryzen 7‚ and Ryzen 9 models within the supported generations. Refer to the GIGABYTE support page for specific model compatibility and recommended BIOS versions for optimal performance and stability.
Expansion Slot Configuration (PCIe)
The Aorus B450 Pro WiFi features a flexible PCIe configuration‚ offering multiple slots for expansion cards. It includes one PCIe 3.0 x16 slot‚ ideal for high-end graphics cards‚ operating at its full bandwidth when a single card is installed. A second PCIe 2.0 x16 slot is present‚ but operates at x4 bandwidth when the primary x16 slot is in use. This allows for secondary cards like capture cards or additional GPUs.
Furthermore‚ the motherboard provides three PCIe 2.0 x1 slots for expansion cards such as sound cards‚ network adapters‚ or storage controllers. The PCIe lanes are intelligently allocated to ensure optimal performance. When utilizing multiple PCIe devices‚ bandwidth sharing may occur‚ so refer to the motherboard manual for detailed lane allocation diagrams and recommendations for maximizing performance.
NVMe SSD Installation and Configuration
The Aorus B450 Pro WiFi supports high-speed NVMe SSDs via a single M.2 slot‚ directly connected to the CPU via PCIe lanes for maximum bandwidth. Installation is straightforward: locate the M.2 slot‚ typically covered by a heatsink‚ remove the screw‚ insert the NVMe SSD at a slight angle‚ and secure it with the screw. Ensure the SSD is firmly seated.
Upon booting‚ the BIOS should automatically detect the NVMe SSD. If not‚ enter the BIOS setup and verify that the M.2 slot is enabled in the storage configuration settings. You may need to select the correct boot order to prioritize the NVMe SSD as your primary boot device. After OS installation‚ ensure you’ve installed the latest NVMe drivers for optimal performance and stability.
Warranty Information and Support Resources
GIGABYTE offers a standard warranty for the Aorus B450 Pro WiFi motherboard‚ typically spanning three years from the date of purchase. This warranty covers defects in materials and workmanship under normal use. Proof of purchase is required for all warranty claims. The warranty does not cover damage resulting from misuse‚ overclocking‚ or modifications.
For comprehensive support‚ visit the official GIGABYTE website. There‚ you’ll find frequently asked questions (FAQs)‚ detailed product specifications‚ driver downloads‚ and BIOS updates. GIGABYTE also provides a robust online support forum where users can exchange information and seek assistance. Direct technical support is available via email or phone‚ with contact details listed on the website. Registering your product online extends support options.
